4.19. Realm Management Extension (RME)

FEAT_RME (or RME for short) is an Armv9-A extension and is one component of the Arm Confidential Compute Architecture (Arm CCA). TF-A supports RME starting from version 2.6. This chapter discusses the changes to TF-A to support RME and provides instructions on how to build and run TF-A with RME.

4.19.1. RME support in TF-A

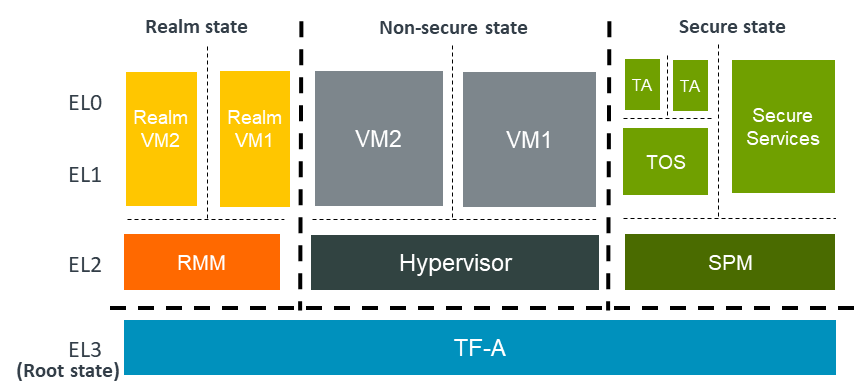
The following diagram shows an Arm CCA software architecture with TF-A as the EL3 firmware. In the Arm CCA architecture there are two additional security states and address spaces: Root and Realm. TF-A firmware runs in the Root world. In the realm world, a Realm Management Monitor firmware (RMM) manages the execution of Realm VMs and their interaction with the hypervisor.

../_images/arm-cca-software-arch.png

RME is the hardware extension to support Arm CCA. To support RME, various changes have been introduced to TF-A. We discuss those changes below.

4.19.1.1. Changes to translation tables library

RME adds Root and Realm Physical address spaces. To support this, two new memory type macros, MT_ROOT and MT_REALM, have been added to the Translation (XLAT) Tables Library. These macros are used to configure memory regions as Root or Realm respectively.

Note

Only version 2 of the translation tables library supports the new memory types.

4.19.1.2. Changes to context management

A new CPU context for the Realm world has been added. The existing CPU context management API can be used to manage Realm context.

4.19.1.3. Boot flow changes

In a typical TF-A boot flow, BL2 runs at Secure-EL1. However when RME is enabled, TF-A runs in the Root world at EL3. Therefore, the boot flow is modified to run BL2 at EL3 when RME is enabled. In addition to this, a Realm-world firmware (RMM) is loaded by BL2 in the Realm physical address space.

The boot flow when RME is enabled looks like the following:

  1. BL1 loads and executes BL2 at EL3

  2. BL2 loads images including RMM

  3. BL2 transfers control to BL31

  4. BL31 initializes SPM (if SPM is enabled)

  5. BL31 initializes RMM

  6. BL31 transfers control to Normal-world software

4.19.1.4. Granule Protection Tables (GPT) library

Isolation between the four physical address spaces is enforced by a process called Granule Protection Check (GPC) performed by the MMU downstream any address translation. GPC makes use of Granule Protection Table (GPT) in the Root world that describes the physical address space assignment of every page (granule). A GPT library that provides APIs to initialize GPTs and to transition granules between different physical address spaces has been added. More information about the GPT library can be found in the Granule Protection Tables Library chapter.

4.19.1.5. RMM Dispatcher (RMMD)

RMMD is a new standard runtime service that handles the switch to the Realm world. It initializes the RMM and handles Realm Management Interface (RMI) SMC calls from Non-secure.

There is a contract between RMM and RMMD that defines the arguments that the former needs to take in order to initialize and also the possible return values. This contract is defined in the RMM Boot Interface, which can be found at RMM Boot Interface.

There is also a specification of the runtime services provided by TF-A to RMM. This can be found at RMM-EL3 Runtime Interface.

4.19.1.6. Test Realm Payload (TRP)

TRP is a small test payload that runs at R-EL2 and implements a subset of the Realm Management Interface (RMI) commands to primarily test EL3 firmware and the interface between R-EL2 and EL3. When building TF-A with RME enabled, if the path to an RMM image is not provided, TF-A builds the TRP by default and uses it as the R-EL2 payload.

4.19.2. Building and running TF-A with RME

This section describes how you can build and run TF-A with RME enabled. We assume you have read the Prerequisites to build TF-A.

The following instructions show you how to build and run TF-A with RME on FVP for two scenarios:

  • Three-world execution: This is the configuration to use if Secure world functionality is not needed. TF-A is tested with the following software entities in each world as listed below:

    • NS Host (RME capable Linux or TF-A Tests),

    • Root (TF-A)

    • R-EL2 (RMM or TRP)

  • Four-world execution: This is the configuration to use if both Secure and Realm world functionality is needed. TF-A is tested with the following software entities in each world as listed below:

    • NS Host (RME capable Linux or TF-A Tests),

    • Root (TF-A)

    • R-EL2 (RMM or TRP)

    • S-EL2 (Hafnium SPM)

To run the tests, you need an FVP model. Please use the latest version of FVP_Base_RevC-2xAEMvA model. If NS Host is Linux, then the below instructions assume that a suitable RME enabled kernel image and associated root filesystem are available.

4.19.2.1. Three-world execution

1. Clone and build RMM Image

Please refer to the RMM Getting Started on how to setup Host Environment and build RMM. The build commands assume that an AArch64 toolchain and CMake executable are available in the shell PATH variable and CROSS_COMPILE variable has been setup appropriately.

To clone RMM and build using the default build options for FVP:

git clone --recursive https://git.trustedfirmware.org/TF-RMM/tf-rmm.git
cd tf-rmm
cmake -DRMM_CONFIG=fvp_defcfg -S . -B build
cmake --build build

This will generate rmm.img in build/Release folder.

2. Clone and build TF-A Tests with Realm Payload

This step is only needed if NS Host is TF-A Tests. The full set of instructions to setup build host and build options for TF-A-Tests can be found in the TFTF Getting Started. TF-A Tests can test Realm world with either RMM or TRP in R-EL2. In the TRP case, some tests which are not applicable will be skipped.

Use the following instructions to build TF-A with TF-A Tests as the non-secure payload (BL33).

git clone https://git.trustedfirmware.org/TF-A/tf-a-tests.git
cd tf-a-tests
make CROSS_COMPILE=aarch64-none-elf- PLAT=fvp DEBUG=1 ENABLE_REALM_PAYLOAD_TESTS=1 all

This produces a TF-A Tests binary (tftf.bin) with Realm payload packaged and sp_layout.json in the build/fvp/debug directory.

3. Build RME Enabled TF-A

The TF-A Getting Started has the necessary instructions to setup Host machine and build TF-A.

To build for RME, set ENABLE_RME build option to 1 and provide the path to the RMM binary rmm.img using RMM build option.

Note

ENABLE_RME build option is currently experimental.

Note

If the RMM option is not specified, TF-A builds the TRP to load and run at R-EL2.

git clone https://git.trustedfirmware.org/TF-A/trusted-firmware-a.git
cd trusted-firmware-a
make CROSS_COMPILE=aarch64-none-elf- \
PLAT=fvp \
ENABLE_RME=1 \
RMM=<path/to/rmm.img> \
FVP_HW_CONFIG_DTS=fdts/fvp-base-gicv3-psci-1t.dts \
DEBUG=1 \
BL33=<path/to/bl33> \
all fip

BL33 can point to a Non Secure Bootloader like UEFI/U-Boot or the TF-A Tests binary(tftf.bin) from the previous step.

This produces bl1.bin and fip.bin binaries in the build/fvp/debug directory.

TF-A can also directly boot Linux kernel on the FVP. The kernel needs to be preloaded to a suitable memory location and this needs to be specified via PRELOADED_BL33_BASE build option. Also TF-A should implement the Linux kernel register conventions for boot and this can be set using the ARM_LINUX_KERNEL_AS_BL33 option.

cd trusted-firmware-a
make CROSS_COMPILE=aarch64-none-elf- \
PLAT=fvp \
ENABLE_RME=1 \
RMM=<path/to/rmm.img> \
FVP_HW_CONFIG_DTS=fdts/fvp-base-gicv3-psci-1t.dts \
DEBUG=1 \
ARM_LINUX_KERNEL_AS_BL33=1 \
PRELOADED_BL33_BASE=0x84000000 \
all fip

The above command assumes that the Linux kernel will be placed in FVP memory at 0x84000000 via suitable FVP option (see the next step).

4. Running FVP for 3 world setup

Use the following command to run the tests on FVP.

FVP_Base_RevC-2xAEMvA                                          \
-C bp.refcounter.non_arch_start_at_default=1                   \
-C bp.secureflashloader.fname=<path/to/bl1.bin>                \
-C bp.flashloader0.fname=<path/to/fip.bin>                     \
-C bp.refcounter.use_real_time=0                               \
-C bp.ve_sysregs.exit_on_shutdown=1                            \
-C cache_state_modelled=1                                      \
-C bp.dram_size=4                                              \
-C bp.secure_memory=0                                          \
-C pci.pci_smmuv3.mmu.SMMU_ROOT_IDR0=3                         \
-C pci.pci_smmuv3.mmu.SMMU_ROOT_IIDR=0x43B                     \
-C pci.pci_smmuv3.mmu.root_register_page_offset=0x20000        \
-C cluster0.NUM_CORES=4                                        \
-C cluster0.PA_SIZE=48                                         \
-C cluster0.ecv_support_level=2                                \
-C cluster0.gicv3.cpuintf-mmap-access-level=2                  \
-C cluster0.gicv3.without-DS-support=1                         \
-C cluster0.gicv4.mask-virtual-interrupt=1                     \
-C cluster0.has_arm_v8-6=1                                     \
-C cluster0.has_amu=1                                          \
-C cluster0.has_branch_target_exception=1                      \
-C cluster0.rme_support_level=2                                \
-C cluster0.has_rndr=1                                         \
-C cluster0.has_v8_7_pmu_extension=2                           \
-C cluster0.max_32bit_el=-1                                    \
-C cluster0.stage12_tlb_size=1024                              \
-C cluster0.check_memory_attributes=0                          \
-C cluster0.ish_is_osh=1                                       \
-C cluster0.restriction_on_speculative_execution=2             \
-C cluster0.restriction_on_speculative_execution_aarch32=2     \
-C cluster1.NUM_CORES=4                                        \
-C cluster1.PA_SIZE=48                                         \
-C cluster1.ecv_support_level=2                                \
-C cluster1.gicv3.cpuintf-mmap-access-level=2                  \
-C cluster1.gicv3.without-DS-support=1                         \
-C cluster1.gicv4.mask-virtual-interrupt=1                     \
-C cluster1.has_arm_v8-6=1                                     \
-C cluster1.has_amu=1                                          \
-C cluster1.has_branch_target_exception=1                      \
-C cluster1.rme_support_level=2                                \
-C cluster1.has_rndr=1                                         \
-C cluster1.has_v8_7_pmu_extension=2                           \
-C cluster1.max_32bit_el=-1                                    \
-C cluster1.stage12_tlb_size=1024                              \
-C cluster1.check_memory_attributes=0                          \
-C cluster1.ish_is_osh=1                                       \
-C cluster1.restriction_on_speculative_execution=2             \
-C cluster1.restriction_on_speculative_execution_aarch32=2     \
-C pctl.startup=0.0.0.0                                        \
-C bp.smsc_91c111.enabled=1                                    \
-C bp.hostbridge.userNetworking=1                              \
-C bp.virtioblockdevice.image_path=<path/to/rootfs.ext4>

The bp.virtioblockdevice.image_path option presents the rootfs as a virtio block device to Linux kernel. It can be ignored if NS Host is TF-A-Tests or rootfs is accessed by some other mechanism.

If TF-A was built to expect a preloaded Linux kernel, then use the following FVP argument to load the kernel image at the expected address.

--data cluster0.cpu0=<path_to_kernel_Image>@0x84000000         \

Tip

Tips to boot and run Linux faster on the FVP :
  1. Set the FVP option cache_state_modelled to 0.

  2. Disable the CPU Idle driver in Linux either by setting the kernel command line parameter “cpuidle.off=1” or by disabling the CONFIG_CPU_IDLE kernel config.

If the NS Host is TF-A-Tests, then the default test suite in TFTF will execute on the FVP and this includes Realm world tests. The tail of the output from uart0 should look something like the following.

...

> Test suite 'FF-A Interrupt'
                                                               Passed
> Test suite 'SMMUv3 tests'
                                                               Passed
> Test suite 'PMU Leakage'
                                                               Passed
> Test suite 'DebugFS'
                                                               Passed
> Test suite 'RMI and SPM tests'
                                                               Passed
> Test suite 'Realm payload at EL1'
                                                               Passed
> Test suite 'Invalid memory access'
                                                               Passed
...

4.19.2.2. Four-world execution

Four-world execution involves software components in each security state: root, secure, realm and non-secure. This section describes how to build TF-A with four-world support.

We use TF-A as the root firmware, Hafnium SPM is the reference Secure world component running at S-EL2. RMM can be built as described in previous section. The examples below assume TF-A-Tests as the NS Host and utilize SPs from TF-A-Tests.

1. Obtain and build Hafnium SPM

git clone --recurse-submodules https://git.trustedfirmware.org/hafnium/hafnium.git
cd hafnium
#  Use the default prebuilt LLVM/clang toolchain
PATH=$PWD/prebuilts/linux-x64/clang/bin:$PWD/prebuilts/linux-x64/dtc:$PATH

Feature MTE needs to be disabled in Hafnium build, apply following patch to project/reference submodule

diff --git a/BUILD.gn b/BUILD.gn
index cc6a78f..234b20a 100644
--- a/BUILD.gn
+++ b/BUILD.gn
@@ -83,7 +83,6 @@ aarch64_toolchains("secure_aem_v8a_fvp") {
    pl011_base_address = "0x1c090000"
    smmu_base_address = "0x2b400000"
    smmu_memory_size = "0x100000"
-    enable_mte = "1"
    plat_log_level = "LOG_LEVEL_INFO"
  }
}
make PROJECT=reference

The Hafnium binary should be located at out/reference/secure_aem_v8a_fvp_clang/hafnium.bin

2. Build RME enabled TF-A with SPM

Build TF-A with RME as well as SPM enabled.

Use the sp_layout.json previously generated in TF-A Tests build to run SP tests.

make CROSS_COMPILE=aarch64-none-elf- \
PLAT=fvp \
ENABLE_RME=1 \
FVP_HW_CONFIG_DTS=fdts/fvp-base-gicv3-psci-1t.dts \
SPD=spmd \
BRANCH_PROTECTION=1 \
CTX_INCLUDE_PAUTH_REGS=1 \
DEBUG=1 \
SP_LAYOUT_FILE=<path/to/sp_layout.json> \
BL32=<path/to/hafnium.bin> \
BL33=<path/to/tftf.bin> \
RMM=<path/to/rmm.img> \
all fip

3. Running the FVP for a 4 world setup

Use the following arguments in addition to the FVP options mentioned in 4. Running FVP for 3 world setup to run tests for 4 world setup.

-C pci.pci_smmuv3.mmu.SMMU_AIDR=2              \
-C pci.pci_smmuv3.mmu.SMMU_IDR0=0x0046123B     \
-C pci.pci_smmuv3.mmu.SMMU_IDR1=0x00600002     \
-C pci.pci_smmuv3.mmu.SMMU_IDR3=0x1714         \
-C pci.pci_smmuv3.mmu.SMMU_IDR5=0xFFFF0475     \
-C pci.pci_smmuv3.mmu.SMMU_S_IDR1=0xA0000002   \
-C pci.pci_smmuv3.mmu.SMMU_S_IDR2=0            \
-C pci.pci_smmuv3.mmu.SMMU_S_IDR3=0